Published Permissions

Monday 29 May 2017

5 Christmas Cards for May............


Good morning!

Here I am with my offering of Christmas cards for May (remember my new years resolution - 5 Christmas cards a month!!).

Each one is different so I've grouped them here for you to take a look at each one a bit more closely.


Each one rather different this time and all using Clarity Stamps and those lovely Spectrum Noir sparkle pens! Some Woodware fluffy stuff and glitter has also been added for that extra Christmassy feel!

There, Month five - mission complete!!!! How am I doing so far?

As the summer comes, they may get a bit simpler due to holidays etc but I'll still try my best and get five a month done for you to see.

Thanks for stopping by today.
Leanne xx


Friday 26 May 2017

"Hello There".............


Good morning!

I've had a go for the current Rubber Dance challenge of "Rule of Three". 

I didn't take photo's for this one so I'll talk you through how I got there.

Firstly I stamped the three flowers with sparkle pens and them restamped over the top with black ink using my misti and masked them over with drawing gum.

The background was next and has been created using the new distress oxide inks leaving some white space open.

I have then played with some different stencils and stamps and doodled around the background.  I'm loving greys at the moment!!!

Rubbed off the drawing gum, highlighted the lovely dragonfly stencil and some of the stencilling and stamped my sentiment of "Hello There".

Stamped the three butterflies on to old book pages and covered in glossy accents and attached to the card.

Mat and layered.


Finished! - Happy with that!


I would like to enter this piece in to the Rubber Dance current challenge of "Rule of Three":-

Thanks for stopping by today,
Leanne xx


Wednesday 24 May 2017

Follow Your Dreams............


Good morning!

Here I am with a mid week post with my entry in to this months Clarity challenge of "Up In The Air".     I thought this challenge was at first a very obvious one - up in the air - birds, balloons, aeroplanes, hot air balloons etc so I decided to put my twist on things as usual and think just outside that box again!  My plan - dreams!!! well, I was thinking up in the air ....... bubbles!!!!! Now, I have a rather sad confession as the moment..........I AM ABSOLUTELY OBSESSED WITH BUBBLES AT THE MOMENT!!!!!! Check out my other posts over the past month and you'll see all the different ways I've been having so much fun making a mess - I mean playing with paint and ink!!!!!  So this is where my mind went with this theme, dreams and thought bubbles.....up in the air.

Now, must confess I only took a couple of photo's as I was so deep in thought with this one that I completely forgot to take photo's through most of it! I'll talk you through how I got there though:

OK, started with a piece of 6 x 6 watercolour card stock and used my brayer to bring down that lovely distress ink from the top (here I have used Salty Ocean).  Then I blended again with the brayer,  Mustard Seed distress ink up from the bottom to meet in the middle.  I popped on a moon/sun mask (clarity) and went a little heavier with the blue to give me a nice light moon and then with the outer part of the mask I covered the moon/sun again and blended some of the Mustard Seed colour in with a make up sponge to give me a proper sun.

I then added the girl with the clarity stencil in cobalt blue archival ink.  

The hills were next and they were blended with the clarity blending brush and the Clarity mountains and hills mask.

I then popped the plastic mask of the girl on top of her and just brushed some ink outwards off of the mask around her with a clarity blending brush.

The clouds are a Clarity mask too and they were done using the clarity blending brush - lovely effect.

Stamped the sentiment which is a Clarity Club stamp - perfect for this card.

Stamped a few of the small grasses here and there and then moved on to my bubbles!!!!


Woohoo!!! These are how I formed my bubbles just with the use of an old pot lid, drawing ink and some washing up liquid in the mix!  I always do plenty and then I can take my pick of the best ones!  Allowed to dry overnight.


Once dry I stamped the palm trees (perhaps dreaming of a holiday?), the girl and her dog (perhaps dreaming of a new pet or just of her beloved pet?) and the couple (perhaps dreaming of love?).  I then covered each bubble with Glossy Accents and allowed to completely dry.

I then rubbed some fern green archival ink around the bottom of the bubbles to give a bit of a shadow and cut them out.

Applied to card with some small bubbles that were hand drawn with polychromo pencils.

I really enjoyed making this one, kept me thinking but lots of fun!

I would like to enter this in to the Clarity Stamp Facebook challenge of "Up In The Air".

Thanks for stopping by,
Leanne xx


Monday 22 May 2017

Creative People Colour Outside The Lines...............


Good morning!

This is the first opportunity I've had on the blog to properly show you the new distress oxide ink pads AND THEY ARE AMAZING!!!!!  Must admit, pushed the boat out and bought the whole 12 pad set and have had loads of inky fun!

The key to working with the oxide pads is to use water, the oxide effect only comes out with the use of water.  The other major factor with these ink pads is that they layer on top of each other WITHOUT BLENDING so you can layer with one colour, you must dry that layer before adding the next but when you do, it just sits on top of the previous colour so unlike the usual distress inks, they do not form "mud" when layered on top of each other.  So remember, stamp on to your craft mat, spray with water, swoosh your card in to the ink, begin to dry with your heat tool and spray again with water as you do.  When dry, repeat the process with a different colour! See it all transform in front of your eyes, it's brilliant for us inky messy crafters!!!! You can also use them to stamp with brilliantly.

Here I have had a play with the distress oxide ink pads.  The background has had several colours used and then I even stamped a lace pattern with the oxide ink too.

The main focal image is from the Beautiful You stamp set from Stampin Up and the sentiment has been stamped from a Visible Image set and cut up and placed around the artwork.

I think you can see that I had such fun making a mess / I mean getting nice and inky with this one!!!!

Hope you have enjoyed your visit today,

Thanks for stopping by,

Leanne xx

Friday 19 May 2017

The World Is Full Of Beauty When The Heart Is Full Of Love............


Good morning!

Well, here is a scene and a half for you this morning!  I fancied having a go for a couple of current challenges both themed around fantasy but fantasy and fairies aren't really my thing!!!  I hope that you like watching how I interpret the different themes for the challenges, I do hope that I inspire you to have your take on them too and have a go!!????

Right, took plenty of photo's along the way with this one, lots of different stages to deal with and I must confess, I did have to plan this one out a bit before I got going.  I knew what I wanted to achieve but had to do some thinking before I put stamp to card stock!  Right, hop on board, let's take our journey this morning:-


OK, I did this quick sketch of what I wanted to achieve in the late of an evening - I even made a note at the top look - as I didn't have a butterfly made by Lavinia Stamps (but I had a fairy that had a good set of wings on her to make one out of!!!!!!).  

So, you can imagine now, it's the next morning, I went in to my craft room, sat at the craft desk, saw this drawing and thought "oh my, where was my mind when I did this!!!!!!!!!!!!!" - I soon came back to where I had left off the evening before and the creative juices were flowing once more! Note the numbers on the sketchy drawings - this is of course, the rough order in which I need to stamp in - a good tip!


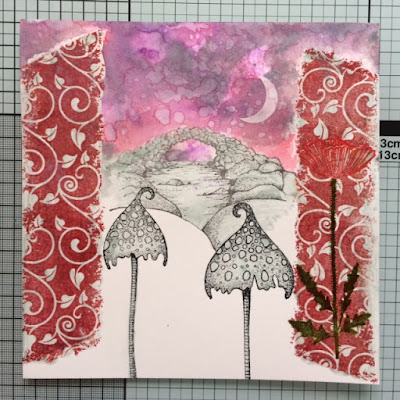
OK, I made a start, stamped the poppy on the right first in red and green archival.  Stamped the toadstools next and immediately masked them off, then the bridge (I went off piste here a bit in the order of doing things - but that's ok).  Masked everything over with Pebeo drawing gum.


I wanted this piece of artwork to look like it was two doors opening on what was my vision of a fantasy land so I had to angle the doors of course so I just masked off the top and bottom of the stamp before adding the ink pad. With me so far?


Those side doors are now down in red archival ink.


Doors masked with drawing gum.  I then set on to the sky.  This I have done with the new distress oxides.  I then used a moon mask and gently sponged some white gesso through it to form that moon.


Woohooo! That's put my mark on it!!!  Got out those delicious Spectrum Noir Sparkle Pens and went for it!  I wanted some wonderful, fantasy colours to be seen. I also stamped the trees in behind the bridge. The sentiment was added at this stage too.


Right, where am I, oh yes! The masking fluid has been rubbed away from everywhere here (see the lovely little trees are now BEHIND the bridge.


Out came the Polychromo's and I shaded in the bridge, the water, the toadstools, the vines on the doors and a bit more on the poppy head.  I masked the sentiment just with a piece of paper and stamped the falling vines straight across there.  The fairies have been stamped on to tissue paper (gift tissue) and backed with double sided adhesive paper so that they effectively became stickers for me. I have some lovely little silver scissor embellishments here at home so I used some wire cutters to cut off the finger holes - I have used those as door handles for the fairies here.  Glossy Accents has been added to the toadstools, the river and the fairy wings. Further poppies were stamped down at the front. some dark distress ink was applied around the edges to draw you further in to the picture.


Now, had to make a butterfly!  For the Lavinia Stamp challenge I need to use just Lavinia Stamps so this fairy was needed for her wings!!!  Out came the brayer to reverse one set of wings and bingo! - the job was done!


The butterfly was coloured in using the Polychromos  and the rest of that little pair of scissors (having chopped the finger holes off!) was added as the butterfly body! Well, it's a fantasy land, nothing is real is it?.....................or is it???????????????

I hope you've enjoyed your journey today, there was lots to do on this one, it's very busy, very full of things to look at - those fairies are welcoming you in to their world.............I'd like to go, if only for a day....... wouldn't you?

I would like to enter this in to the following challenges:-

Lavinia Stamps "Make Your Own Vision" - my vision of a land of fantasy:-

Stamping Sensations "Butterflies, Fairies and Fantasy":-


Wednesday 17 May 2017

Ring a ring O'Roses..............


Good morning!

Here is my mid week post and it's an entry that I've prepared for the current Allsorts Challenge of "Ring a ring O'Roses"

I have taken some photo's along the way so lets see how I get there with this one.

As with all of my artwork, I have a good think about it before I get going and I wanted to put the history and a feeling for the nostalgia in to this piece.  We must remember that many relate this nursery rhyme to the great plague where Ring a ring O'Roses was thought to represent the rosy rash caused by the plague and the pockets full of posies were thought to be posies of herbs carried to hide the terrible smells.  A tissue,  a tissue we all fall down was of course part of the dreadful symptoms and the falling was the inevitable if you caught the plague.  The circle of children playing and dancing round in a ring to the nursery rhyme holds special memories for most of us I'm sure!   This wasn't just a nursery rhyme, this nursery rhyme had a reason and a meaning, caused great upset and trauma yet gave so many children such fun - a strange thought isn't it when you think about it...... Well, although a bit of a sad origin, it is also a much loved and well recognised nursery rhyme to all of us so lets see how I saw it in my mind on a piece of artwork.


So, I set sail with an idea in my mind!  I have started with a lovely piece of sheet music (paper) and stamped out my rose which is a Kaisercraft one.  I have used two tones of archival ink as at this stage on the stamp - wasn't 100% sure of the mediums that were to be used and archival will take most things thrown at it! I very quickly clear embossed over the top before the ink dried.


OK, I've used some ink sprays here, a couple of Imagination crafts mix media sprays and a Creative Expressions one too.
 The paper buckled a little which of course it will but I knew that it was going over a canvas so that didn't worry me at this stage.
I added a little touch of gold gilding wax over the embossing powder to just highlight the roses a little and over stamped some of the roses in black to crisp them up a bit.


Here I have used matt Mod Podge over the front of the canvas and the back of the music paper and laid the canvas on the back of the artwork.  I then went around the back of the canvas edges (having cut across the corners with scissors) and the edges of the paper with the Mod Podge and folded the edges in to neaten.


Neat and tidy and nice and thick on the canvas now with no wrinkles. Allow to dry - doesn't take long.


Here a sentiment has been added that I thought appropriate "Cherish the times we spend together" also from Kaisercraft and I have used some Clarity Stamp wee folk (a little girl and a little boy) to stamp the ring of children.  This was completed by stamping a girl and boy on to tissue paper and reversing them to form the "ring".
I then highlighted the children with a white pen.


So here we are! I mounted the covered canvas on to a piece of plain card stock to pop it from the rest of the card.  (I also added some embossing powder to the roses on the canvas at this stage too). That went on to a layer of sheet music that I had distressed with scissors and stained with  distress ink and that went on to the main card which had been stamped with the same rose, coloured with distress ink and a distress oxide ink.  I used a Sheena Douglass stencil at the top "Remember When" and I have used Clarity Stamp alphabet to stamp out Ring a ring O'Roses at the bottom.

I was pleased with this, It was exactly what I was aiming for, the reminiscence of a wonderful nursery rhyme, the children playing and the history that so many fell to this dreaded disease.

Has this brought back memories of dancing in a ring and falling down?  Do you "remember when".

I would like to enter this in to the Allsorts challenge of "Ring o ring O'Roses":-

Allsorts are celebrating their 8th birthday this Saturday so don't forget to pop on over to check out whats happening there this coming Saturday!


Hope you enjoyed your journey with me today, thanks for stopping by,
Leanne xxx


Monday 15 May 2017

Winner of Sheena's Ink-ettes silhouette challenge!


Good morning!

Just thought I'd share some good news with you all - On Sunday morning my card, (featured on this blog on Wednesday 10th May), won the Sheena's Ink-ettes Facebook challenge of Silhouettes and backgrounds - and I'm thrilled to bits!

Sheena Douglass products have long been a favourite of mine and how wonderful to have won this challenge using lots of them.

I'm even more happy because I loved this piece of artwork as it looks so like "my boys" - my two Golden Retrievers Bobbi and Lucky.

I would like to thank all the team for choosing my artwork as the winner - I'm really grateful.


Good morning everyone! Time to announce the winner of the Inky Inkette Challenge for Silhouette/Background! Thankyou to everyone who entered and believe me when I say this was no easy task with so many fantastic entries to choose from, the talent in this group is just amazing! Leanne C Harris your card was chosen as the winner! Fantastic card and a well deserved winner. We just love how you captured the playfulness of the 2 dogs and your background is ace! Congratulations! :) xx Over to Jo Oliverfor the next challenge! I cant seem to tag Leanne in this message but hope someone can :) xx

Sunday 14 May 2017

It's Going To Be Wild at Fashionable Stamping Challenges this month!!!!!!


Good morning!

It's a new challenge over at Fashionable Stamping Challenges and this month the new theme is Sandras' choice of "Let's Go Wild!".

http://www.fashionablestampingchallenges.com/2017/05/14/challenge-123-lets-go-wild/


I chose to follow this theme with an African night sky and bring in the wild theme as the wild animals in the wild - loved it!

You will notice the fabulous gentle sparkle that is on this card, that's because it started life with Spectrum Noir Sparkle Pens.  I have blended the sparkle pens down the page blending from a blue, to a purple to an orange and then back out at the bottom with a brown.

I then popped on a horizon with some distress ink and a piece of paper and then lifted out the colour for the moon with water and a paper towel.

The animals were stamped on (all Inkylicious) and highlighted with a white pen to show a reflection of that big moon on them. The Foliage at the front is a stamp by Graphic 45 and the stencil work at the top is a Sheena Douglass stencil.


Popped this on for you, to show you the lovely sparkle that is there from the sparkle pens.


Mat and layered in black and white.

I do hope that this has given you some inspiration to have a go at our new challenge this month.  PLEASE REMEMBER THAT WE ARE A STAMPING CHALLENGE AND THAT THE MAIN FOCUS ON YOUR ARTWORK MUST BE A STAMPED IMAGE - NO DIGITAL IMAGES PLEASE.


Come on folks - "Let's go Wild"!!!!!!


Thanks for stopping by,
Leanne x


Friday 12 May 2017

Love Makes The Wildest Spirit Tame.............


Good morning!

Well here we are with a card that I've made for the current Cards in Envy challenge of "Motherly Love".

Having had Mother's Day here in the UK back in March I chose to put a twist on this theme and use a wonderful Imagination Crafts art stamp of a Mummy elephant with her two babies - well, it's Motherly Love isn't it?!!!!

I started with a blank piece of watercolour card and swept some of the new distress oxides (diluted) across and down the page.  This gave me a nice, calm colour on which to build my elephants colours on to.

I then stamped the main image with perfect medium and heat embossed with black detail embossing powder.

I then used distress oxide ink (again, diluted) to paint in what I needed on the elephants to give them some depth and shadow.

The hills were produced from torn copy paper and a couple of Momento inks and the sun was lifted out with water, as too, were the clouds.

The foliage was stamped in one of the Momento inks at the front (Bee Crafty) and the bird was added at the top and shaded in and the sentiment stamped ( both Pollyanna Pickering).

Mat and layered. 

I would like to enter this in to the current Cards in Envy challenge "Motherly Love":-

Thanks for stopping by today,
Leanne x


Thursday 11 May 2017

Dance Like Nobody's Watching for De Stempelwinkel......


Good morning!

Well, it's an extra treat for you this week (that's four posts this week and there will be one at the weekend too!!!! - phew!!!!!).

I have been playing with my stamps by De Stempelwinkel - lovely company and good quality stamps that get your imagination going.  I have made this card for their current challenge of Bright Blue.

I have taken some photo's so lets see how I got there shall we -


OK, this card started life as a piece of smooth Sheena stamping card and I have dabbed on three colours of acrylic paint using a damp baby wipe allowing each colour to dry before adding the next one.


Now, those of you that follow me closely will know that I'm going through a "bubble phase" at the moment!!!! Oh boy, it's so fun and soooo messy!!!!!  Here I have blown my bubbles in a bowl with dark blue drawing ink and caught them on the card and left them to dry - really dreamy!!!!  I then stamped my sentiment which wasn't as easy as it looks because this sentiment actually runs the length of another De Stempelwinkel stamp that I have and is attached to a a girl dancing and listening to music!  I had to very carefully ink the sentiment only and hope for the best - I did well and got it right! I also added some very large bubbles using an old pot lid just dipped in to the bubble solution.


At this point, I have enhanced the large bubbles with some of the drawing ink, a charcoal pencil and then topped with Glossy Accents with some chunky glitter (the card will buckle a bit at this stage but panic not, it sorts itself out in the end).  I also stamped some small flowers that De Stempelwinkel sent me as a small free offering with my order which was very kind of them so I thought that I should put it to good use!

My image of the dancer was also stamped in blue versafine ink for a nice, crisp oily surface and I clear embossed over the top to seal that.

Almost there!


I have added a reversed image of the stamp here.  This is done by stamping the image on to tissue paper (gift tissue) and turning it over to reverse it.

Mat and layered in white and blue and I have blended the actual card to take the starkness of the white away by blending with distress ink around the edges.

Hope you liked our journey today, thanks for stopping by,
Leanne xx

I would like to enter this in to De Stempelwinkel challenge of "Bright Blue":-


Wednesday 10 May 2017

Just Playin'..........


Good morning!

I thought I'd have a go at the Sheena Douglass Inkettes challenge of "backgrounds/silhouettes" - brilliant challenge and lots of fun.

I must confess, it was a complete "no brainer" for me for this one, I have two gorgeous Golden Retrievers, two brothers, Bobbi and Lucky who will be 3 years old next month and I just knew the Sheena stencil that was going to be used here!

For those of you who have never met them - say "hello" to Bobbi and Lucky!


So, coming back to the project in hand! - I started by creating my background with Spectrum Noir Sparkle Pens.  I shaped the mount of a hill and lifted the sun/moon out using water and blotting with tissue.  The clouds were formed by moving the ink around with water and also blotting.

To get the effect of the rolling hill, I again used water and a paint brush to give me that effect, wavering with the brush to give me the look of grass a little bit.

I then stamped the trees, stencilled the leaves hanging down to draw you in and stamped the meadow flowers at the front.  I just felt that the front of the picture needed another something to draw you in and so, I stamped the butterfly on to black card, heat embossed with black embossing powder and then cut around and cut in to the butterfly with a craft knife too.

"My boys" were highlighted with a white pen to show the light coming off of that sun/moon and the sentiment stamped.

All stamps and stencils used are by Sheena Douglass.

I can't help but smile when I see this finished card, every time that I look at it sitting there in my craft room at the moment just brings joy to my mind, my boys are beautiful, loving, caring and devoted companions to all of our family and we love them so much!!!

I dedicate this blog post to "My Boys" xxxxxxx

Thanks for stopping by today, hope this has made you smile, perhaps not as much as me but believe me, this is how they play together each and every day........
Leanne xx

I will be entering this in to the Sheena Douglass Inky Inkettes challenge of backgrounds/silhouettes:


Monday 8 May 2017

Capture The Moment and Make It Last Forever.............


Good morning!

Here is a card that I've made using the Visible Image Stamps Face It set - they are brilliant!


I started with stamping the eye and the nose and mouth and masking them off with drawing gum.

I then concentrated on the background, on this piece of artwork I've used the new Distress Oxides.

I went across her face with a Visible Image tree (this is from the set that has the seasons on it).  I have used the oxide ink to stamp this several times and I also clear embossed a few of the branches to give me a watermark effect on there. Some white highlights were added to some of the branches.

I gave the face some depth by applying black soot distress ink with a smoothie down the nose and brow area.

Visible Image birds were embossed in white and feathers were stamped in the oxide ink.

After rubbing away the drawing gum, I highlighted the eye with a white pen and coloured the eye green. The lips were touched in using oxide inks diluted.

I gave depth around the face using the Visible Image face stencil allowing a small gap for lightness to bounce that face off of the background.


The sentiment was stamped along side her face early on in this project and the same sentiment at the top was stamped on as the last thing done.

I mat and layered and added some black smudges all around the white mat to make it all blend together.


I felt this had an African feel to it, just shows you that anything is possible when your mind explores the possibilities!

Hope you've enjoyed your visit today, thanks for stopping by
Leanne x

I'd like to enter this in to the Visible Image Facebook challenge of "Express Yourself":

Craft Stamper Take it Make it May Challenge :


Sunday 7 May 2017

Bold and Beautiful............


Good morning! Hope you are having a lovely weekend?

Here I am with an extra blog for you for this week.  I am having SO MUCH FUN with the new Visible Image "Face It!" stamp set, I can hardly put it down at the moment!  (I shall be sharing another make with this same stamp tomorrow, it's very clever - well, I think so anyway!!!) So look out for that one.  Infact, I shall be sharing three makes with you this week, Monday, Wednesday and Friday so I hope that you will look forward to those and I can keep you inspired and that mojo up!!!

A new technique has been used here and boy, did I have lots of fun and don't ask about the mess I got in to!!!!!!  I was at my happiest but it took a while to clean up after this one!!!!!

So, I took my time with this one, took lots of photo's for you along the way so lets take our journey and see how I got there shall we, climb aboard, here we go!


I started with a piece of watercolour card stock, you will notice that I have mounted it here on just a normal piece of white copy paper and then on to a further piece of the same watercolour card stock - it will become clear why I did this as we go along .....well, have to keep your mind ticking over don't I!!!!  The "Face It" set by Visible Image has been stamped here in black Archival ink.


I masked the eyes and mouth off with Pebeo Drawing Gum.


OK, I then stamped two flowers from Imagination Crafts with Archival Tiger Lily ink (you will notice that the left flower has over ran the card stock and part of it has come out on the outer layer behind - intended!  I then masked these flowers off with drawing gum.  

THEN THE EXCITING BIT HAPPENED!!!!! I tried the technique of bubble printing - gosh, I remember doing this as a child (and getting in to a mess then!!!!!) but why can't I bring it in to my artwork now? ABSOLUTELY I CAN!!!! So, in three shallow dishes / or deep plates I placed acrylic paint - I have used Pebeo Decocreme orange and indian pink and Americana calico red in each of my dishes. To each dish I added a small amount of water to dilute the thick acrylic paint a little and a good "dollop" of washing up liquid (dish soap).  Give each dish a good mix, each dish with it's own paint brush!  I then took three drinking straws, tilted the dish towards me so that I'd got a deeper amount of the paint mixture and blew in it with my straw to form a mountain of bubbles!!!!! See, I'm 45 (but really, lose the 5, I'm about 4 years old in my head!!!!!!!!!).   Once you've got the mound of bubbles, swipe you card across them and allow each colour to dry before attempting to move on to the next colour.  You can see here, that I've got the orange, red and rose colours done both on the front card and the backing piece.


So here I have moved on.  Unfortunately you do lose a few of the bubbles when you fill in the background a bit but this can't be helped and just ensure that you leave some of them for the cool effect and also on the backing piece.  Here I have used distress ink (worn lipstick) to give shade and depth to the face and distress ink carved pumpkin around the outside of the face.

Visible Image stamps of the flower from the Thank You set and Flower Inkognito set have also been stamped on there and the drawing gum has been removed. You can see the definition of the face coming through now.

The next step was to paint in the flowers and lips with the distress inks and I have used a sparkle pen (Harvest moon - a lovely orange) on the flower over the right eye.  The eyes I went the whole hog and coloured in with a deep red alcohol pen and highlighted with a white pen.


Please don't think that I work any tidier than anyone else - can you see why I lose things along the way?!!!!!!


Here are some shots of the bubbles more close up for you.....


So, here you go, the copy paper was in-between for a reason - did you get it?  Yes, that's right, it acted as the black mat that you see here on the finished piece - it just got replaced when mounting it all up - well done!

Finally I stamped my sentiment again, Visible Image and from the "Own It!" set this time and stamped in juicy Versafine black onyx.

There, a different technique and as my friend Sandra would say - "a breath of fresh air" on this one.  Thoroughly enjoyed it, lots to see and lots of different steps and stages but I was really pleased with this one.

Well, bus stops here I'm afraid for today but it returns tomorrow  so make sure you are at that bus stop to hop on board and take a journey with me.

Thanks for stopping by,
Leanne xx

I would like to enter this card in to the following challenges:-

Rubber Dance Colour Challenge:

Craft Stamper - Take It Make It May Challenge:

Artistic Stamper Challenge - Floral Fantasy:

Country View Challenges - Flower Power:

That's Crafty - Bright:

Time Out Challenges - Flowers with optional twist of kissing technique:

Visible Image monthly show and tell: