Published Permissions

Friday 30 December 2016

There is beauty in simplicity......


Good morning!  Hope you've had a lovely Christmas.

As it's rather a busy time at the moment I thought we'd take a look at a piece of artwork that I did a month or so ago using what I call "brayer clean up" card - yes, you've got it, when I'm creating a piece of artwork with a brayer, I clean off the brayer on to another piece of card stock!


Now, the only photograph I have of the background to this card is with another brayer clean up piece so I tell you what I'll do - I'll blog the second piece (the green/yellow one) on Monday and you can see where that one went too (sound like a plan?).  OK, lets take our journey with the one at the bottom this time.


Now I have to confess, there wasn't many photo's taken but here you can see where I was going with it.  I have started to layer up with the use of several stencils.  Gesso has been used and some Imagination Crafts Starlights paints for some shimmer on there too.  In the bottom left hand corner I have used some clear paste through a heart stencil, left it to dry and then sponged on some colour (similar to what was already there) to bring out those hearts.

A few circles with white acrylic paint using old lids.


Woohoo! Look at those starlights shine!!!


A bit of enhancement of the bubbles and the sentiment stamped in perfect medium and finished in white embossing powder and it was done.

Not bad from a piece of "waste" card!!! Clever brayer!!!!

Hope that's given you some inspiration to think about how one project can bounce off of the back of another?

Look out for the other brayer clean up piece on Monday.

Wishing you all a very happy new year - enjoy yourselves and most importantly, keep safe.

Thanks for stopping by,
Leanne xx


Monday 26 December 2016

Live with promise, Laugh with pleasure......


Good morning! I hope that everyone has had a really lovely Christmas - Happy Boxing Day!

Earlier this month I had lots of fun when I went out with some friends (we actually went Christmas wreath making) and I thought of them when I fell across this stencil whilst having a bit of a craft tidy (much needed!!!) - so this piece was born!

I had a wonderful time having fun with one of my gelli plates and Stencilgirl stencils! I have taken photo's along the way so lets take our journey and see what a mess I got in to....... (I mean, see how I got there!!!!!).


OK, first of all I laid my mask on to my gelli plate and I used acrylic paints brayered straight over the top.  I then removed some of the paint with some scrunched up paper towel then removed the mask.  Of course, there is no paint where the mask had covered the plate so I lifted the print and this is what I got. 

This is often how I craft, I just "go with the flow" and see what I get! - Then, I work with what I've got tweaking it along the way!!!


So here I used the actual stencil part and laid it on top and ink sprayed through it so that the ladies started to take on some colour. You will notice at this point that I had laid the mask down slightly off centre so that I got a natural white edge to the right hand side. I'll show you the actual stencil and mask that I've used at the end of this post.


So here the mask has been laid down over the sprayed green area to allow me to work on that background a bit further.  This will give those of you that get a bit confused with stencils and masks a chance to see the difference - the mask is the "cut out" of the aperture of the stencil (the inney) and the stencil is (the outey) bit!!! - hope I'm helping and not confusing further!!!!

Here you can see that I've sprayed some purple paint on to that background (it's still wet!).


I've swapped the mask for the stencil again now and have sponged some brown on to the ladies to enhance them a bit. An Indigoblu script stamp has been used and the sentiments have been stamped at this stage but need more work....


There!!!! mighty fine job!!! - even if I do say so myself!!!!!!!

I've worked on the sentiments with alcohol pens and a white pen and used my charcoal pencil to pop the ladies off of the page.

Mat and layered.

There, a card to create a memory - celebrate with friends! Really pleased when a plan comes together!


The Stencilgirl mask (the inney).


The Stencilgirl stencil (the outey).


Impresson Obsession sentiment and Indigoblu script stamp used.

Hope you like what you've seen and that you've found it useful if you were struggling to remember your masks from your stencils - I also hope that I've helped you to open doors to using some masks and stencils that you may have at home and were wondering what to do with them!!!!!.

I would like to enter this in to the Time Out Challenge - "Inspired by words":-
http://timeoutchallenges.blogspot.co.uk/2016/12/challenge-73-inspired-by-words.html


Thanks for stopping by,

Leanne x


Friday 23 December 2016

Happy Christmas!


Good morning and Merry Christmas to each and every one of you - especially those of you that have followed me along my crafting journey this year.

It's almost Christmas Eve and I just wanted to get this very short post on to wish you all a very
Merry Christmas and a very happy and healthy 2017.

I look forward to my new found friendships growing further and to inspiring and encouraging others to share in my love of craft through 2017.

"Happy Christmas".

Leanne x


Monday 19 December 2016

Follow your heart and believe in your dreams..............


Good morning!

Another of my efforts when just "having a play"! I have taken photo's so let's take our journey to see how I got there.


OK, this card started life as my usual piece of Sheena Stamping card with three different colours of artistry ink dabbed down with a sponge applicator.  Then I used some gesso to dab on some lighter colours giving us that sort of bokeh effect.


I've stamped my images (flowers and sentiment - Leonie Pujol) and the little fairy come sort of bumble bee fairy I have no idea of it's maker! I have taken a photograph for you which I'll pop on here but I've had this set for some time and it doesn't state a maker?


Now, this was more effective that I thought it would be to be perfectly honest! Don't you just love those little happy accidents that come out better than planned!!!!  I decided to used neat household bleach to take out some of the colour to bring those lovely stamped images to the forefront but didn't realise that it would look so nice and effective!


This is the mystery stamp set that I have used!


So I finished off by stamping some of the flowers just with water and lifting off some of the colour and with a few drifts of bleach across the piece and a few dots of gesso using the handle end of my paintbrush I was done.

Mat and layered.

I thought this looked rather care free and happy, suitable for someone perhaps starting a new job, takings exams or even moving home / relocating and flying off to dreams a new.

Hope you like what you've seen and enjoyed the journey today.

I'd like to enter this card in to the Stamping Sensations challenge - Floral Fancies:-

Thanks for stopping by,
Leanne xx


Friday 16 December 2016

Sweets For My Sweet......


Good morning!

Right, well, I've been having a play with some Darkroom Door stamps for a challenge over at Cards in Envy that I wanted to join in with "Wouldn't that be sweet" - well is this bright enough for you!!!!?

Personally I can't stand Liquorice Allsorts but boy, does this look jolly!

I have done a step by step so you'll be able to see how I got there so lets take our usual journey :-


OK, I started with my blank piece of card and stamped the Allsorts image twice in two different directions. I also stamps some sweeties (also from the same Darkroom Door stamp set).  I also clear embossed the sentiment "Sweets For My Sweet" twice (but you'll notice that I wasn't happy with it twice so I changed that towards the end!). You can see that I have also covered all the images with masking fluid at this stage.


Lots of colour going on now! - and it went all over me and no, I wasn't wearing an apron!
So, I used Aquatints for the background and went straight over the masked off images.  Once happy, I rubbed away all the masking fluid and using the same aquatints, I coloured in the Allsorts and used some Decoart metallic paints to colour in the sweeties. The sweeties were then embossed using either gold or silver embossing powder to give them some depth.  The clear embossed sentiments resisted the Aquatints and popped through.  


I have restamped Staz On ink and the sweetie stamp straight over the top of the sweets - this was experimental to see if I could make them look like they were in cello wrappers and it worked a treat!


Now it was coming together -  I then had to make the Liquorice Allsorts pop off the page so they were coloured in with a black alcohol pen.  I stamped the word "yum" on there too! The sweeties had some glossy accents added to make them shine like a true sweetie wrapper!


I edged around the two Liquorice Allsorts panels with a black pen and I wasn't happy with the two embossed sentiments so I restamped it in black embossing powder on to a piece of card that had been painted with two of the Aquatint colours and die cut it and attached.

Mat and layered and I was done! 

It's a very flat image from the work that I usually produce but that's the name of the game with this stamp - the challenge asked for something sweet so we got sweets!!!!

Hope you've enjoyed this bright and colourful journey - I didn't find this the easiest set of stamps to work with but the final result couldn't be more jolly!!!! (even if I don't like liquorice!!!!).....

I would like to enter this in to Cards in Envy "Wouldn't that be "sweet" card challenge":-

Thanks for stopping by,
Leanne xx


Sunday 11 December 2016

Happy Christmas........


Good morning!

It's a new challenge over at Fashionable Stamping Challenges today with the theme "Anything Goes" - (well, I had to do Christmas then didn't I?!!!!). Come and join us, with such an "open" theme it's easy to have lots of fun and show us what you can create!

http://www.fashionablestampingchallenges.com/2016/12/11/challenge-118-anything-goes/

OK, lets take our journey shall we.....


Isn't this a stunner of a stamp? It's the Impression Obsession J7042 Santa Horses stamp.

I started with my usual plain white Sheena stamping card and stamped the horses in Archival watering can.  I coloured their hats in with Spectrum Noir colouring pencils (you will see this on the next photo).  I then pressed some perfect medium through a stars stencil and embossed with clear embossing powder.

I then blended the background with distress ink (weathered wood) to show the white stars more clearly.

I cut two black mats and a silver one and passed the black mats through my Platinum machine with an embossing folder that looked like snow falling by Leonie Pujol. (I had to pass them through twice as my card was wider than the 5 x 7 embossing folder so I hotched the folder over a bit and ran it through again!).

I then stroked the embossed card with a tiny bit of Pebeo silver gilding wax to highlight the snow falling - it looks so metallic!

The sentiment was stamped "Happy Christmas" (Bee Crafty) and edged with the weathered wood distress ink and matted on to black card stock.


Here I was playing with the idea of a nice red ribbon? - Yes, I think that works well!!!


There, who said that you can't do monochrome for Christmas?!!!!

Matted and layered up and red felt ribbon and bow to finish with some die cut ivy leaves (Sue Wilson - Creative Expressions) which I also finished with a touch of silver gilding wax.

I thought this was really classy! I shall choose someone special to receive this one I think!

Do come along and join us at Fashionable Stamping Challenges with our new theme of 
"Anything Goes".

May I wish all at Fashionable Stamping Challenges, the Design Team and all you out there who enter and make the challenges such fun for us all a very Merry Christmas!

I would like to enter this in to The Artistic Stamper Creative Team blog challenge "Christmas":-

Thanks for stopping by,
Leanne x


Friday 9 December 2016

Our Friendship is Special...........


Good morning!

An extra post this week (lots of crafty pieces about here at the moment due to Christmas!).  I only have this one photo of the finished ornament so I'll talk you through it as best I can and show you the original stamp that I have used to get there.

This lovely ornament started life as an mdf heart - it's quite large measuring about 5 inches in length. I coated both sides in gesso and when dry I started work on the front.  I have stamped my main image (Impression Obsession) of the dear little robin - well, I guess he/she could be any bird really, it's just that I have turned him in to a robin!!!

I popped a small amount of modelling paste over the chest area and the tail to give it a bit of texture and relief.

Then I coloured the image in using Spectrum Illustrator markers and with their alcohol base, they blend beautifully if you use the blender pen to help you.

Then added some more of the modelling paste to form some snow at his feet and to balance the whole picture.  I sponged some archival ink around the edges and darkened one side with a charcoal pencil (a bit of a trademark of mine!) and highlighted the legs and feet with a white pen.  The sentiment was stamped in Staz on and again highlighted with white pen.  The Staz on bled a little bit (I was suspicious that this would happen but it looked great and gave it a lovely shadow so it stayed!).

Finally I coated the whole thing with spray and shine and left to completely dry then added a lovely ribbon and some twine to hang it.

I have actually made three of these for three very special ladies this Christmas and on the back I transferred the Fashionable Stamping Challenges logo for them as we are all Fashion Stampettes from the Fashionable Stamping Challenges design team. - I thought they came out really well - something to keep and remind them of me!

It really is super shiny but I just couldn't get this to pick up on the camera (sorry)!!!


Hope you like it and thanks for stopping by,

I would like to enter this in to the Sweet Stampin challenge of "Let it Snow":-

My Time To Craft "Christmas Animals":-
Leanne xxx

Wednesday 7 December 2016

My Christmas Door Wreath.........


Good morning!

Well, we are going way off piste this morning and in to a little bit of a private peek of what I've been up to in my preparations for Christmas!  Last weekend I joined some friends and we attended a workshop to create our own Christmas door wreaths, well, it's craft isn't it? So I thought I'd share my efforts with you!

Yes, I did take some photo's along the way so you'll be able to share the experience with me.


OK, so when we arrived, our basic spruce wreath had been prepared for us - although this doesn't look very big, believe me, it's a VERY LARGE wreath!  So we were given the basic greenery wreath and some floristry wires.  We had a lovely demonstration, tea and homemade Christmas fudge and then we were let loose!


What a mess we began to make!  There were 12 in the class and it was a two and a half hour workshop but it went so quickly!  So here we are (my spot was second down on the left hand side) applying lovely variegated holly and dark and variegated ivys - we had loads to choose from in big bumpy bags - it was great - a pair of secateurs and we were away!


So here we have moved on slightly and all our foliage is on and we are adding all the glitz and glamour to them.  We had lots of choice from baubles and cinnamon sticks to whole dried oranges or sliced and sliced apple.  There were pine cones, pheasant feathers, ribbons, all sorts of lovely Christmassy goodies to decorate however we wished to.


Ta Dah!!!! What do you think? I added lights and was really, really chuffed with it.  My fingers weren't so convinced though after all the twiddling of wires!


Yours truly and now you really can see the size of it - the wreath that is - I know the size of me 😒😂!!!


At night.


By day.

This workshop was rang by Jenny from Baytree Cottage Workshops in Farthingstone:-
Jenny runs all sorts of different workshops from crafts to cooking - do take a look.

Now that front door is not your average sized front door and that is no average sized wreath!!!! £40 for the workshop and I personally think that that must be a bargain.

Well, hope you've enjoyed a little insight in to a wreath making workshop and my journey to one too.

Thanks for stopping by,
Leanne x


Monday 5 December 2016

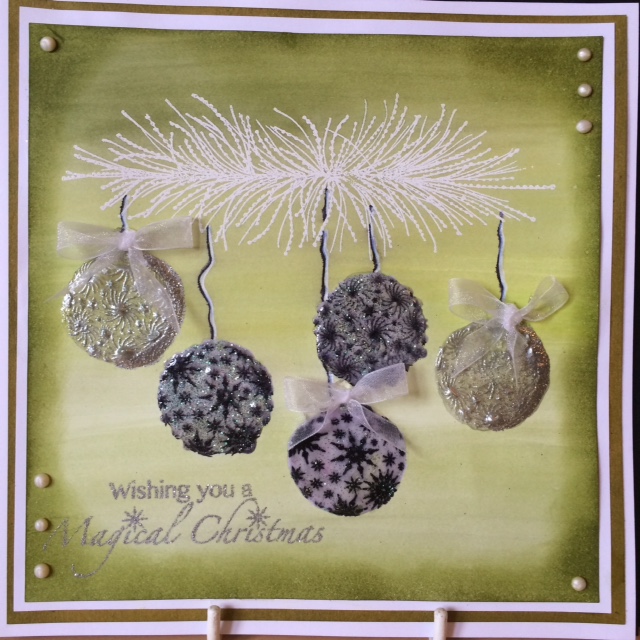
Wishing you a magical Christmas.....


Good morning!

Only took a couple of photo's of this one in it's making so I'll talk you through how I got there.

Started with my usual Sheena stamping card and coloured my background using Spectrum Aqua Markers.

I stamped my pine spray and the five baubles (all Stamps by Chloe).  The pine was embossed with white embossing powder.  Two baubles were silver embossed and three were in black archival ink.  I then decided that I wanted more dimension so that the baubles looked more round (they looked too flat to me) so I added glossy accents to each one of them and allowed it to totally dry.  Still wasn't happy so I added some sparkle embossing powder over the top on the black baubles and stamped over again with silver embossing powder on the two silver baubles - yes, I am now stamping on top of dry glossy accents! - When I heat embossed all five baubles again not only did the embossing powders melt but the glossy accents bubbled and made the most realistic effect leaving them "lumpy bumpy"!!

I stamped my sentiment "Wishing you a Magical Christmas" (Stamps by Chloe) and embossed in the silver sparkle embossing powder (Cosmic Shimmer).

Darkened the edges with distress ink and added ribbon bows to three baubles and some dots of Cosmic Shimmer pearl pva.

Mat and layered.


Here you can see the lovely roundness that the baubles have to them.

Happy with that, very pretty.

Thanks for stopping by,
Leanne xx


Friday 2 December 2016

With Love & Thanks.......


Good morning!

Here's something a bit sweet don't you think? Zinouk du jardin by Carabelle-Studio.

I took a couple of photo's so I'll talk you through it, lets take our journey....


Right, I started with a piece of Sheena stamping card and painted a couple of colours of aquatints on to an acrylic block, mixed the colours up a bit and then laid the stamping card on to the block - aquatints cover so well.  I had a couple of runs but that's fine, I like those! and left it to dry (doesn't take long at all).

I then sprinkled some water from my finger tips, let it soak for a moment and mopped up some of the paint.

Then I stamped all the images from this stamp set and coloured them with alcohol pens and the flowers with sparkle pens too.

I then stamped some bubbles (from old pot lids) and highlighted with a white pen and a charcoal pencil then finished with glossy accents so that they looked like real bubbles.

Added Zinouk and a couple of sentiments "Dream" and "With Love & Thanks" - both Inkylicious - the "& Thanks" are Sentimentally Yours by Phil Martin.


Matted and layered in lovely bright yellow and orange - very happy with that! Nice and sweet and jolly!

Also check out some really lovely new stamps that Crafty Individuals have launched here - well worth a look:-

I would like to enter this in to the Cards in Envy challenge "Thank you":-

Thanks for stopping by,
Leanne x