Published Permissions

Wednesday 30 November 2016

Lets get wrapping!!


Good morning!

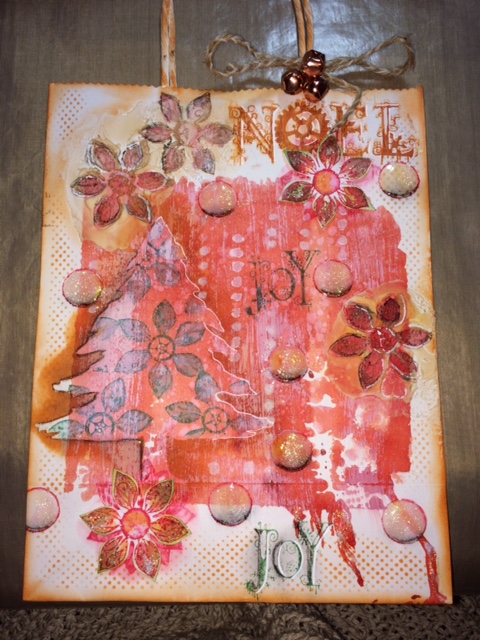
Well, this is different for me!  I had an evening to myself and got out a plain white paper bag (a large bag - this measures 10" x 8") and went a bit grungy with it! - I wanted an "old fashioned, quite worn look" and was pleased with this.  didn't take photo's - completely forgot but I'll talk you through how I got there.

Started by finding my largest acrylic block and applied some fired brick distress re-inker to it, then spritzed with water and laid the bag on top of it. This gave me a base on which to start.  It ran a little at the bottom but I always like a run so that could stay.

I then swept some white gesso downwards from the top with a brush to tone it down a bit.

Then I used a stencil - the mask section (Christmas tree by Clarity stamp) and sponged some orange Artistry Ink around the edge to darken.

Some white embossing paste was applied to a couple of areas and left to harden slightly.  Once I was happy that it had started to go off, I stamped my flowers (Chocolate Baroque) in to it and washed my stamp immediately.

The same flowers were stamped in Artistry Ink (Blaze red) a couple of times on top of each other and smudged with a brush and some water and left to dry.

Again, using the same Christmas flower stamp, I used the actual stencil part of the Christmas stencil and laid that over the already highlighted tree and stamped in Artistry Ink (emerald green) the flowers to fill the tree area.

Two flowers were stamped on to water colour card with the blaze artisty ink and painted in with water and some of the green and orange inks. I also painted in to the now dried embossing paste to give the images some colour within the texture.

The words "Joy" and "Noel" both Chocolate Baroque were stamped on to the bag.

The tree was given some definition with a charcoal pencil and white pen and some lovely bubbles or snow falling was added using old pot lids to stamp with, painted in with diluted gesso, charcoal work to give depth and then covered in glossy accents with some glitter sprinkled on while still wet.


Here you can see the texture going on and the cut out flowers have been stuck on at this point too.

I added a string bow with three rose brass bells and sponged some ink to the handle. I added a little glitter texture paste here and there to give a flash of sparkle to some areas.


Traditional in it's colours with a grungy twist!

There, that will help wrap someones gift won't it and it's unique and very me!!!!

I would like to enter this bag in to the following challenges:-

Chocolate Baroque colour challenge:-

Stamps and Stencils challenge "Tags, bags and boxes":-

Thanks for stopping by,
Leanne x


Monday 28 November 2016

Art Depends Not On Who Creates It......


Good morning!

Well, I think I've gone a bit mixed media for me but I've had a fantastic time!!!!

I've taken photo's along the way so let's take our usual journey shall we?

This card started life as a piece of greyboard and I applied 2 coats of gesso to it.

I cut some die cuts (Sue Wilson trailing ivy, JustRite floral dies, Couture Creations scrolled tomentosa) and stuck those down always remembering to leave some nice blank space in the middle for stamping on to.  I applied some Pebeo sand texture paste and some pebeo normal texture paste, left it all to dry and painted a further layer of gesso over the top so that my paints had a good surface to sit on.


All looks a bit "white" but that will change!! (Infact, I quite like the white look - ummmm, food for thought, watch this space!!!!!).

Aquatints were used to colour. - I just looooove aquatints!!!!


Pebeo gilding wax was then rubbed on to highlight - perfect!


Now we're getting there!!!!


My sentiment was stamped and the eye (both Carabelle Studio).  I worked further on the eye to enhance it with white pen and glossy accents.  Although stars appear on the eye stamp, I added more!


Mat and layered up in matching card stock - voila! 

Quite a modern and up to date card, this would even keep the younger girls interested- my daughter liked it!

Hope you like what you've seen,

I would like to enter this in to the current Country View Challenge of "Stars":-

Thanks for stopping by,
Leanne xx


Friday 25 November 2016

A Strong Woman believes.......Season's Greetings


Good morning!

Well, I thoroughly enjoyed making this card!  It wasn't the fastest card I've ever made but I was really "deep in to it" every step of the way - have you ever been there?!!!

Somehow, I did remember to stop every now and then and take photo's along the way so lets take our usual journey shall we?


Ok, started with my usual piece of Sheena stamping card and stamped the main image - time traveller steampunk woman by Sheena Douglass.  I then stamped the propeller from Sheenas' voyage of discovery stamp set - these were all stamped with Archival watering can ink.  I then masked off the woman and the propellers with masking fluid and started to fill the open space with holly and ivy stamps by Clarity Stamp.  The drawing gum was then rubbed away.


I laid some lace over the top and sprayed through with some Cosmic Shimmer spray mist.


I then set to colouring in the holly and ivy and woman with Spectrum Noir colouring pencils and I finished the pine cones and berries with alcohol pens.

It was coming together!!

I painted in some diluted spectrum aqua pen ink around the woman to "pop" her out.

I then decided to stamp the sentiment from this same stamp set "A Strong Woman believes she can do anything and she does" at the bottom and stamped "Seasons Greetings" out and die cut round it and attached it to one of the lovely bunches of holly. Sponged distress ink around both sentiments and attached.

Mat and layered.


What a card to give to a strong woman - or just someone special that you feel deserves to know that you think that they are strong and inspirational - you know, I know exactly who I am going to give this card to this Christmas.....

Hope you've enjoyed the journey today and that you like what you see, let me know with a kind comment, I love to read your views on my work - it makes it all worthwhile!,

I would like to enter Moving Along With The Times challenge of "Anything Goes.....with Christmas":-
http://movingalongwiththetimes.blogspot.co.uk/2016/11/34-anything-goes-with-christmas.html

Thanks for stopping by,

Leanne xx

Tuesday 22 November 2016

"Art Sisters"


Good morning!

Well, following the Try it on Tuesday challenge "sun, moon, stars" - I achieved a top 5 place and Avril kindly asked if I would do a guest designer spot for them for their new challenge "Layer it up" which goes live today - so here is my inspiration with lots of layers!!!!

Please go over to the Try it on Tuesday challenge blog and have a go and show them what you can do  - it's so great to see your wonderful efforts and how each and every one of us comes up with something so completely different!

I have done a full step by step so lets take our journey shall we?


I started with my usual piece of sheena stamping card and sponged on some distress inks (shabby shutters, crushed olive and peeled paint).


I stamped my central image and using a Sue Wilson pierced square die, cut that out and worked out the largest die from this set that I would need and just put a pencil line around the outside so that I knew the space that I had got to play with!.


Ok, then I had some fun using the same distress inks and some lovely stencils, from Stencilgirl, Clarity Stamp and Imagination crafts.


So here I have laid down my Sue Wilson pierced square dies and taped them in to position.  To have your dies so close to each other like this isn't always advised as they can jump in your die cutting machine and damage each other but I find that if you are careful it's usually ok and if it's not, then you've only got yourself to blame!!


So you can see what is happening now (from the other side).


Here we are, the right side facing us and all the layers perfectly cut.


OK, I've worked through the "art sisters" sentiment on to the actual card blank so that when it is all placed and assembled on my card, it all looks right! I have also at this stage backed each layer on to sturdy craft card as it would have been tricky to get those layers together. Some highlighting has been done around the images too.


Waahaaay!!!! That's what I call layering it up!!!!
Foam tape has been applied behind each layer.


There, the end of todays journey, bus stops here!

Well, art sisters is what we are isn't it?

Hope you enjoyed the journey, don't forget to go over to the Try it on Tuesday challenge blog and show us what you can do with our new challenge of "layer it up" we all look forward to seeing your creativity and good luck!!!!

Thanks for stopping by,
Leanne xx


Sunday 20 November 2016

Nan.....


Good morning!

An extra blog this week again.  This card has been made for my children to give to my mother - it's her birthday on Christmas Eve and yes, (she'll be 70 - be we won't mention numbers anymore!!!).

The card has an almost eerie feeling to it but we must remember that it is for a bang on Christmas birthday and I wanted it to be and feel angelic.

I must admit, I didn't think I would put this on the blog but was so pleased with it's outcome I changed my mind and when I saw a challenge at That's Crafty that it matched perfectly for (but by then, it's too late to think about photo's - oops!!!!!).

This card started as an old background that I had made on the gelli plate using Sheena's stamping card.  You can just about see at the bottom that it was made with the help of acrylic paints and bubble wrap!

So, firstly I stamped my angel (isn't she beautiful and graceful) - by Crafty Individuals.  (so within her you see the original piece of gelli plate painted card and how light it was at first).  I then masked her off with masking fluid.  I needed to tone down this background so I knocked the colour back with some gesso dragged down over it and let that dry.  Then toned it down again with some distress ink (I'm not sure what colour I've used, could be weathered wood?).  Then rubbed away the masking fluid.  Stamped a first generation sentiment of "love"(by Visible Image) at the bottom and a second generation at the top, stamped "Nan" and added die cut numbers.

Backed it on to some of the original gelli plate print ripped in to two strips and then on to a further mat that I have stamped some circles on using old bottle lids and white gesso and gold starlights paint.

Mat and layered with silver card stock and finished with some black glue dots.

How angelic is that! With a bit of glitter it would have been a fabulous Christmas card - no, brain off, I can't use my mums birthday card from my children for a christmas card - or can I??? - NO!!!!!!!

"Happy Birthday Nan" with lots of love from Hayley and Katie xxx

I would like to enter this card in to the That's Crafty challenge "There must be an angel":-

Thanks for stopping by,
Leanne xx

Friday 18 November 2016

I'm Grateful............


Good morning!

Well I have to admit, this card is a "train journey card" - (meaning that I did most of it while on my train journey up to Durham to see my daughter Hayley at uni!!!) - oh yes, have craft goodies.....can travel!!!!!! - It actually made the journey pass very quickly along with working on my laptop scheduling my blog! (My husband banned all paints so yours truly packed Spectrum Aqua markers and a water brush, along with pencils an acrylic block to mix the colours on, kitchen towel etc etc!!!!).

I took some photo's along the way so lets take our journey and see how I got there shall we?


The first thing that I did was inked up a mini gelli plate and stamped through a normal, pretty paper doily with artistry ink.  I stamped it four times to cover the Sheena stamping card underneath.


There, quite pretty and a good starting point for my stamping.


Right, we were ready to go on the train!!!  (I prepared it to the stage at home!).  I diluted some of the artistry ink on my work mat and just dipped the edges of the card in it and "swooshed" it about in it.  I then stamped my lovely poppies (Woodware) in Archival watering can and we were ready to go!


All the colouring here was done on the train - Spectrum Aqua markers diluted / mixed on my acrylic block and my Spectrum Noir colouring pencils too.  When I got home I highlighted some outer edging with a white pen and the darker side I opted to work with a charcoal pencil.  The sentiment of "I'm grateful" was then stamped in Archival watering can (Chocolate Baroque). Some modelling paste was swept over the same paper doily (I figured that this would have been far too messy on the train and I'd have been asked to get off at the next stop!!!!!!) and some circles were printed with the artistry ink with old bottle lids.


Matted and layered having sponged the same artistry ink on to the outer layer to match the whole colour scheme.

Very happy with that and really pretty! (and was I happy to see my little girl again after six weeks of missing her dreadfully).


A private peek for you (especially those of you that so kindly follow me and pass on such wonderful and kind comments each week - it makes it all so worthwhile).


Myself and Hayley - we went to Lumley Castle for Sunday lunch.


One side of Durham Cathedral - it's enormous!!! A beautiful city if you get the chance to visit.

I would like to enter this piece in to The Craft Barn two weekly challenge of "Poppy":-

Thanks for stopping by,
Leanne xx


Wednesday 16 November 2016

Seasons Greetings.....


Good morning!

An extra blog this week!  I completed a milestone a few days ago - I completed my 2016 new years resolution!!!!! (5 Christmas cards a month.....and I did it having got ahead and did Decembers five too!!!!! yay!!!!!). I will feel really good knowing that they are all done.

OK, this is one of the cards made for Christmas - I wanted a tree just like the one I have here at home at Christmastime - nice and big, fat, fluffy and bushy!!!! I took some photo's of how I got there so lets go on our usual journey shall we?


Started with my usual piece of Sheena stamping card and started to stamp the arms of my tree with a couple of different colour distress inks using a pine branch stamp by Stamps by Chloe. So as you will see, this tree started and continued to form from just one, the same one straight pine branch stamp.


Here we go! By now I have added the same stamp with white embossing powder for some of the branches.


Now I have added some stencilling to the background and some die cut ivy hanging down (ivy makes me think of Christmas as it's always evergreen and always there at Christmastime).


ooooh, looking good!!! You will notice now that I have "knocked back" the background to bring the tree forwards to the foreground (so that the tree doesn't get lost in all the colours).  I have stamped an angel (Crafty Individuals) on to some shrink plastic and heated her to shrink her right down for the top of the tree and the baubles are also on shrink plastic from much larger ones by Stamps by Chloe and some glitter has been added to the baubles and the angel.


With some small hole punch circles of mirror card and some Nuvo pearl drops, a stand and some ribbon we were done! Oh, have you spotted the secret ingredient? - yes, matching feather pieces - perfect!

Mat and layered.

I got the exact effect that I wanted, a nice, fat, bushy and fluffy tree!

Hope you like it too,

I would like to enter this in to the Try It On Tuesday challenge "Trees are green... or any other colour":-

Thanks for stopping by,
Leanne xx


Sunday 13 November 2016

"Tis The Season".....


Good morning!

It's a new challenge over at Fashionable Stamping Challenges and this time it's "Tis The Season" - could be Autumn or Winter.

As you can see, I've gone for winter and a rather Christmassy scene!

I've done a step by step for you so lets take our usual journey....


I started with my usual piece of Sheena stamping card and stamped my lovely little car (Joy! Crafts). I masked the car off with masking fluid.


I had great fun with aquatints for the sky.  I knew I wanted to have snow so I needed a wintry, moody sky.  I then used an Inkylicious stencil to sponge in my hills.


I then stamped all of the trees- in the distance first (Clarity Stamp) and then the closer trees (Inkylicious).  I highlighted the hill tops with some diluted gesso and some tree branches.  The masking fluid was then rubbed off of the car. Now the fun started!  I used fine modelling paste to put my snow on the ground.  I made the tyre tracks with a lolly stick and painting some of it on to the trees and car.


I die cut my little man but didn't have black funky foam, so in true Leanne style I embossed him with black embossing powder!!!


Ta dah!!! Didn't come out too badly did he!!!!


When the modelling paste had dried, I ran some paint in the tyre tracks (diluted black soot distress ink) and toned down the snow on the ground a bit.

My snow flakes are simply the wrong end (non brush end) of my paintbrush dipped in gesso!

I added some modelling paste to the shoulders and umbrella of my man and sprinkled on some Pinflair snow dust to him and on to the car.

Mat and layered and added some snow to the mans feet too.

Lastly added the sentiment "Tis The Season" and that was another Christmas card done!! Hooray!!!

Do pop over to the Fashionable Stamping Challenge and join in with this months challenge
(Tis The Season - Autumn or Winter) - we look forward to seeing all your lovely creativity!

I would like to enter this in to the Stamping Sensations challenge "Christmas Greetings":-

Thanks for stopping by,
Leanne xx


Friday 11 November 2016

"We will remember them"...............


Good morning,

Nothing else I feel is appropriate today - Armistice Day.

We lower our heads, "we will remember them...."

Thank you for stopping by,
Leanne.

Monday 7 November 2016

Those Who Don't Believe In Magic................


Good morning!

Well, I'm getting in to that Christmas spirit early!!!!

This is a card that I have prepared for the current Lavinia Stamp challenge of "Let it snow".

Now, I have to admit, I got so engrossed when I was making this that I actually forgot to take photo's along the way!! - I did remember but when I did, it was a bit too late!!!! So, although we can't take our usual journey, I can talk you through how I got there.

I started with my usual piece of Sheena stamping card and gave it a coat of gesso.

I then die cut the snowflakes and different flourishes (these are all Sue Wilson and Courture Creations  dies).  They were then stuck on to the gesso'd card and another coat of gesso was applied over the top.

A small moon mask was stuck down.

Out came my aquatints and I have used a shade of light pink and light blue on this one and when dry I've applied a light covering of silver gilding wax to bring those images right out. The moon mask was then removed.

All the stamps (trees and stag) are Lavinia Stamps.  I stamped the stag in black versa fine ink and clear embossed him to set.  I then stamped all the other trees.  The sentiment was stamped on (also Lavinia Stamps) and I applied Cosmic Shimmer glacier ice and diamond sprinkles on the trees and around the ground and some for falling snow too.

How pretty is that?!!! Rather mixed media this one - quite different with Lavinia stamps I thought with quite a lot of depth to it -


I would like to enter this card in to the current Lavinia Stamps challenge "Let it snow":-

Fussy and Fancy challenge "Ice/Snow"


Hope you like it!

Thanks for stopping by,
Leanne xx